Author: Jorge Iglesias

  • Benchmarking Tools: A Comprehensive Guide for Testing Computer Performance

    Benchmarking Tools: A Comprehensive Guide for Testing Computer Performance

    Reading Time: 5 minutes

    Benchmarking tools are essential for accurately measuring the performance of your computer. Whether you’re running a high-end gaming PC, a professional workstation, or maintaining a vintage Windows XP build, these specialized applications enable you to gauge CPU speed, GPU rendering capabilities, memory stability, storage read/write performance, and overall system responsiveness. By choosing the right tools and following best practices, you can diagnose issues, verify upgrades, and even compare your system’s performance against industry standards.

    In this guide, we’ll walk you through a range of benchmarking tools suitable for different operating systems and hardware configurations. We’ll start with cross-platform solutions that work on Windows, macOS, and Linux, then move on to options tailored for older Windows XP-era systems, and finally highlight some modern benchmarks perfect for cutting-edge machines. You’ll also find practical tips on how to run benchmarks effectively, interpret results, and make more informed decisions about hardware upgrades and system optimization.

    Benchmarking tools are essential for accurately measuring and comparing the performance of your computer. Whether you’re testing a modern powerhouse or a retro system running Windows XP, choosing the right benchmarking tools can provide valuable insights into CPU, GPU, storage, and overall system health. In this comprehensive guide, we’ll explore a variety of benchmarking options, organized by compatibility and purpose, to help you get the most out of your hardware.

    Why Benchmarking Matters

    Running benchmarking tools isn’t just for bragging rights. Performance benchmarks help you determine if your system is running optimally, identify hardware bottlenecks, and ensure that recent upgrades—like adding RAM or installing an SSD—are delivering the expected performance boost. They can also help troubleshoot issues: for example, if your computer suddenly feels sluggish, a benchmarking test might reveal that your CPU is overheating and throttling. By regularly benchmarking, you establish performance baselines, making it easier to detect changes over time, maintain system health, and make data-driven decisions when planning future upgrades.

    Below are some tools that will help you get started on your benchmarking journey.


    Cross-Platform Benchmarking Tools

    Geekbench

    • Purpose: Cross-platform CPU and GPU benchmarking.
      • If you’re comparing recent CPU performance across platforms, Geekbench offers a straightforward cross-platform scoring system.
    • Compatibility: Windows 7 and newer, macOS, Linux, Android.
    • Download

    Blender Benchmark

    • Purpose: Measures rendering performance using Blender.
    • Compatibility: Windows 10 and newer, macOS, Linux.
    • Download

    Tools for Windows XP and Earlier

    CPU-Z

    • Purpose: Provides detailed CPU information and benchmarking.
    • Compatibility: Windows XP and newer.
    • Download

    Cinebench

    • Purpose: Renders a scene to evaluate CPU and GPU performance.
    • Compatibility: Windows XP and newer.
    • Download

    PerformanceTest

    • Purpose: Measures overall system performance.
    • Compatibility: Windows XP and newer.
    • Download

    3DMark06

    • Purpose: GPU performance benchmarking for older DirectX 9 systems.
      • For gamers looking to measure GPU upgrades under Windows Vista-era hardware, 3DMark06 is a time-tested choice.
    • Compatibility: Windows XP and Vista.
    • Download

    SuperPI

    • Purpose: CPU performance testing by calculating Pi.
    • Compatibility: Windows 95 and newer.
    • Download

    Modern System Benchmarking Tools

    PCMark 10

    • Purpose: Evaluates productivity and system performance.
    • Compatibility: Windows 10 and newer.
    • Download

    HWiNFO

    • Purpose: Comprehensive hardware diagnostics and benchmarking.
    • Compatibility: Windows XP and newer (portable version available for older systems).
    • Download

    CrystalDiskMark

    • Purpose: Tests the read/write speed of storage devices.
    • Compatibility: Windows XP and newer.
    • Download

    Unigine Heaven Benchmark

    • Purpose: Graphics benchmarking with a focus on DirectX 11 performance.
    • Compatibility: Windows Vista and newer.
    • Download

    Specialized Benchmarks for Retro Systems

    Futuremark PCMark Vantage

    • Purpose: Comprehensive benchmarking for Windows Vista systems.
    • Compatibility: Windows Vista only.
    • Download

    AIDA64 Extreme

    • Purpose: System diagnostics and benchmarks.
    • Compatibility: Windows XP and newer.
    • Download

    Tips for Effective Benchmarking

    1. Document System Specifications: Always record CPU, GPU, RAM, storage, and software details before benchmarking.
    2. Consistency is Key: Run each benchmark tool multiple times to account for variability.
    3. Control the Environment: Close unnecessary applications and processes during tests.
    4. Analyze Results: Use tools like spreadsheets or graphs to compare and interpret performance scores.

    Interpreting Your Results

    After running benchmarking tools, you’ll receive numeric scores, frame rates, or throughput metrics that help quantify performance. To make the most of these results, compare them against known baselines, similar systems, or previous test runs. If your GPU benchmark score is significantly lower than the average for your graphics card model, this could indicate driver issues or insufficient cooling. If your CPU runs consistently at the expected performance level but your storage benchmarks lag behind, you might consider upgrading to a faster SSD. Successful benchmarking is all about understanding these numbers and using them to guide future improvements.

    Common Pitfalls and Tips

    While benchmarking tools are powerful, they must be used correctly. Always close unnecessary background applications, ensure your system is at a stable temperature, and run multiple tests to average out anomalies. Pay attention to the versions of the tools you use—newer versions often test different features or use updated methodologies. Keep documentation of every test run, including any hardware or driver changes made between benchmarks. This practice prevents guesswork down the road and creates a clear performance history. Finally, remember that benchmarks are synthetic tests; they offer valuable insights, but real-world performance can vary based on your specific usage patterns.


    This guide offers a starting point for benchmarking various systems, from retro builds to cutting-edge PCs. Stay tuned for our next post, where we’ll focus exclusively on benchmarking tools tailored for all types of Windows systems—perfect for enthusiasts diving into retro computing!

    If you know of any good tools that I’ve left out, please leave a comment, and I’ll give them a review. I’ve also included a link to download all the tools I mentioned in one main zip file, which you can download here.

  • Best Tools for Getting System Information on Modern and Legacy Windows PCs

    Best Tools for Getting System Information on Modern and Legacy Windows PCs

    Reading Time: 4 minutes

    When working with computers, understanding your system’s specifications is vital—whether you’re troubleshooting, upgrading, or restoring a legacy machine. From the newest Windows 11 PCs to classic systems like Windows 95, having the right tools can make all the difference. For enthusiasts and professionals like me, tracking builds and cataloging their components is not just a matter of convenience—it’s an essential step in managing, upgrading, and even benchmarking performance.

    In this guide, we’ll explore the best system information tools for Windows, discuss their compatibility across various operating systems, and examine how this data is critical for tasks like benchmarking, which can provide valuable insights into your system’s capabilities and limitations.


    Modern Tools for System Information

    HWiNFO

    HWiNFO is one of the most comprehensive tools available. It offers in-depth diagnostics and real-time monitoring for modern systems. If you’re running Windows XP, 7, 8, 10 or 11, this tool is perfect for getting insights into your CPU, GPU, memory, and more.

    Strengths

    Real-time monitoring, detailed hardware data.

    Compatibility

    Windows XP and newer.

    Speccy

    If you prefer a simple, clean interface, Speccy is your go-to option. It provides an overview of your system, including CPU, RAM, storage, and temperatures. It’s ideal for quick system checks.

    Strengths

    User-friendly, lightweight.

    Compatibility

    Windows XP and newer.

    Belarc Advisor

    For those who need both hardware details and software insights, including security updates and license tracking, Belarc Advisor offers a unique blend of features.

    Strengths

    Security-focused, detailed license reports.

    Compatibility

    Windows Vista and newer.

    CPU-Z

    Designed for CPU enthusiasts, CPU-Z offers detailed information about your processor, RAM, and motherboard. It’s particularly useful for overclockers and system builders.

    Strengths

    In-depth CPU data.

    Compatibility

    Windows XP and newer.

    HWMonitor

    HWMonitor specializes in real-time monitoring of voltages, temperatures, and fan speeds. If you’re concerned about system health, this tool is a great choice.

    Strengths

    Hardware monitoring.

    Compatibility

    Windows XP and newer.


    My Experience with System Information Tools

    Over the years, I’ve used several tools to gather system information, and two that stand out are HWiNFO32 and CPU-Z. Both are excellent in their own ways, but I’ve found that HWiNFO32 provides a much more detailed breakdown of hardware components and real-time performance metrics. It goes beyond the basics, offering in-depth insights into the CPU, GPU, motherboard, and even sensors, making it invaluable for troubleshooting and understanding system behavior.

    On the other hand, CPU-Z is a simpler tool, focused primarily on detailed CPU specifications and memory data. While it’s great for quick checks, it doesn’t match the depth of HWiNFO32 for overall system diagnostics.

    I’ve also tried CPUID Hardware Monitor, but it didn’t quite meet my needs. While it displayed some temperature readings—like the SSD temps—it felt too limited compared to the comprehensive data provided by the other tools. For anyone needing more than just basic thermal monitoring, I’d recommend exploring options like HWiNFO32 instead.


    Legacy Tools for Older Systems

    If you’re working with vintage systems like Windows 95, 98, ME, or 2000, most modern tools won’t work. Instead, try these alternatives:

    Everest Home Edition

    An excellent tool for legacy PCs, Everest Home Edition provides detailed system diagnostics and runs on older Windows versions.

    • Compatibility: Windows 95, 98, ME, and 2000.

    Sandra Lite (Legacy Versions)

    Older versions of SiSoftware Sandra support legacy operating systems and offer detailed hardware and software analysis.

    • Compatibility: Windows 95, 98, ME, and 2000.

    Built-in System Utilities

    • Use msinfo32 for general system information.
    • Use dxdiag for graphics and sound details.

    Using System Information for Benchmarking

    Benchmarking your system is the next logical step after gathering detailed hardware and software data. Benchmarking allows you to evaluate your system’s performance, identify bottlenecks, and optimize hardware configurations for better efficiency.

    Here’s how system information tools contribute to effective benchmarking:

    1. Baseline Hardware Analysis:
      Tools like HWiNFO and CPU-Z provide detailed specifications for your CPU, GPU, memory, and storage. These serve as the foundation for benchmarking, ensuring you’re testing the actual hardware without assumptions.
    2. Real-Time Monitoring:
      Benchmarking often pushes your hardware to its limits. Monitoring tools like HWMonitor and HWiNFO track metrics such as temperatures, voltages, and clock speeds during stress tests, helping you understand how your system handles high workloads.
    3. Performance Comparisons:
      Many benchmarking tools, such as Cinebench and 3DMark, integrate seamlessly with system information data to contextualize results. For instance, CPU-Z’s benchmarking feature lets you compare your CPU’s performance to similar models.
    4. Tracking Upgrades Over Time:
      Benchmarking combined with detailed system information creates a performance history for your builds. Whether you’re overclocking or upgrading components, you can measure the impact of changes and ensure optimal performance.

    Which Tools Should You Use?

    The right tool depends on your operating system and your needs:

    • For modern systems: HWiNFO, Speccy, CPU-Z, or HWMonitor.
    • For legacy systems: Everest Home Edition or built-in utilities.

    By combining tools, you can gain a complete understanding of your system’s capabilities, whether you’re working on a vintage machine or the latest hardware.


    Conclusion

    Understanding your system’s hardware and software details is essential for any tech enthusiast or professional. Whether you’re diagnosing a Windows XP PC or restoring a classic Windows 98 setup, these system information tools will provide you with the insights you need to manage and optimize your hardware.

    For those looking to take things a step further, these tools also play a crucial role in benchmarking—evaluating system performance, identifying bottlenecks, and tracking upgrades over time. Stay tuned for our upcoming guide on how to use system information tools for benchmarking and which benchmarking tools are best for your needs.

  • Reviving My Old Windows XP Machines: A Trip Down Memory Lane

    Reviving My Old Windows XP Machines: A Trip Down Memory Lane

    Reading Time: 3 minutes

    Reviving Old Windows XP Machines has been on my mind lately, mostly because I’ve been tinkering with computers since I was a kid. Now that I’m 42 going on 43, I find myself drawn back to the systems that sparked my early interest in tech. Recently, I dusted off two of my old towers—a Dell Dimension 4700 and a Gateway 500SE—hoping to see those familiar Windows XP screens again. Little did I know that trying to bring these classics back to life in 2024 would take me on a trip down memory lane, complete with quirky activation loops, retro troubleshooting, and all the nostalgia that comes with it.

    What You’ll Learn in This Post:

    • Why embracing the quirks of vintage PCs can be surprisingly rewarding
    • How I overcame activation loops on a Dell Dimension 4700
    • The phone activation trick that brought a Gateway 500SE back online
    • Tips for restoring old XP desktops, including navigating Safe Mode without a mouse

    Why Reviving Old Windows XP Machines Matters to Me

    I still remember the thrill of booting up a computer in the early 2000s. The spinning hard drive, chunky icons, and that iconic green Start button were more than just visuals—they marked a pivotal moment in personal computing history. Sure, modern PCs are sleek and powerful, but they can’t capture the feeling of rediscovering the OS that guided so many of us into the digital world. Reviving Old Windows XP Machines isn’t just about getting them to run; it’s about reconnecting with the past, savoring the imperfections, and appreciating how far we’ve come.

    Windows XP Activiation

    The Activation Nightmare: Dell Dimension 4700

    When I powered on the Dell Dimension 4700, I expected a quick trip back in time. Instead, I got stuck in a bizarre activation loop. Windows XP insisted I needed to activate before logging in, but every attempt to do so led it to declare I was already activated. Round and round I went, stuck in a digital stand-off that never seemed to end. Booting into Safe Mode didn’t help, especially since my mouse refused to work there. I found myself navigating with just a keyboard, tapping through menus like it was the late ‘90s again.

    The Gateway 500SE: Phone Activation in 2024

    The Gateway 500SE offered a different challenge. This one asked me to activate by phone, providing a toll-free number and an Installation ID. Calling a 1-800 number to activate XP in 2024 felt like time travel, but I followed the prompts, got a text message with a link, and entered the codes as instructed. To my surprise, it worked flawlessly. In just a few minutes, the Gateway was humming along like it was 2005, and I was free to explore all those old programs and memories stored on its hard drive.

    Embracing the Nostalgia

    So why bother reviving old Windows XP machines when today’s hardware and software are so much better? For me, it’s pure nostalgia. There’s a comfort in hearing that old hard drive spin up, seeing those retro icons, and remembering what computing was like before smartphones and streaming services ruled the world. This process reminded me that computing used to be a bit messier and a lot more hands-on. Troubleshooting was a given, and victory felt sweeter when you actually had to work for it.

    Tips for Anyone Trying the Same

    If you’ve got an old XP rig collecting dust, here are a few pointers:

    • Be Patient: Expect weird hurdles and activation loops that make no sense by modern standards.
    • Use Classic Fixes: Don’t be afraid to Google old forum posts or try the file deletion trick I used on the Dell.
    • Embrace Keyboard Navigation: Your mouse might bail on you in Safe Mode, so be ready to navigate like it’s 1998.
    • Enjoy the Ride: Remember, this is about nostalgia, not practicality. Have fun with it.

    Security and Practical Considerations

    Keep in mind that Windows XP no longer receives security updates. If you do connect these machines to the internet, you’re taking a risk. Many enthusiasts prefer to keep these restored PCs offline, using them as dedicated retro gaming stations or to run old software in a safe environment.

    Final Thoughts

    Reviving old Windows XP machines isn’t going to replace your modern setup. It won’t offer blazing speeds or cutting-edge capabilities. What it will give you is a window into the past, a moment to reflect on how personal computing evolved, and maybe a chance to play a few classic games on the hardware they were meant to run on. For me, that’s reason enough to put in the effort, smile at the quirks, and welcome these retro companions back into my tech life.

  • Building a Racing Sim: My Thoughts on Going Virtual

    Building a Racing Sim: My Thoughts on Going Virtual

    Reading Time: 3 minutes

    The idea of building a racing simulator has been on my mind for a while now. Captain Rob; an acquaintance of mine, here in SWFL; mentioned he’s planning to dive into sim racing in 2025, and another friend, Roberto, just went all-in with his own setup. Roberto’s story is what really got me thinking about it. He recently sold his M2 BMW—a car he absolutely loved—for a big truck he needed for work. To help fill the void, he decided to build a proper racing sim. It’s his way of staying connected to the thrill of driving without the car.

    That hit home for me because I’ve been in the market for a race car myself. But seeing what Roberto’s done, I’m starting to think a sim might be a better move. No insurance, no gas bills, no track fees—just the fun of racing without all the extras. Plus, I already have a killer PC and a monitor, so I wouldn’t need to spend as much as he did. I’m just trying to figure out how to fit it into my space and whether it would give me the same satisfaction.


    What You Actually Need to Build a Sim Rig

    Building a racing sim isn’t complicated, but there are a few pieces of gear you’ll need to pull it all together. Here’s the main setup:

    The Cockpit/Frame
    This is what holds the whole thing together, so you want something solid. I’m looking at the Next Level Racing GTElite Lite Racing Cockpit. It’s sturdy, adjustable, and compact enough that I think I could make it work in my space.

    The Seat
    Comfort is key. You’re not going to want to race for more than 10 minutes if the seat feels like a lawn chair. The Recaro Simstar Racing Simulator Seat looks perfect for this—it’s built like an actual car seat, so it feels like the real deal. For a more economical option, check out the Next Level Racing ERS3 Elite Series Reclining Seat.

    The Steering Wheel
    Roberto swears by the Logitech G Pro Racing Wheel, and I trust him on this. It’s got direct drive and TrueForce feedback, which basically means it’s about as close to a real steering wheel as you can get without stepping into a car. He calls the cheaper ones “plastic toys,” and now I can’t imagine going with anything else.

    The Pedals
    The Logitech Pro Racing Pedals complete the setup. They’ve got a load cell brake, swappable springs, and a heavy-duty feel. Once you’ve tried good pedals like these, you’ll never want to use a cheap set again.

    The Display
    I’ve already got this part covered with a Samsung G9 UltraWide Monitor and a 48” LG C1 OLED TV. If you’re starting from scratch, a good display can really make or break the experience. Go ultra-wide or 4K if you can.

    The PC
    This is where a lot of people spend big, but I’m lucky enough to have a custom-built PC that’s more than ready for sim racing: a Ryzen 5950X CPU, RTX 3090Ti GPU, and 64GB of RAM. If you’re building from scratch, aim for a strong GPU and a fast CPU for smooth gameplay.


    How Much Does It All Cost?

    If you’re starting from zero, this kind of setup can get pricey. Here’s what you’re looking at:

    ComponentBase PriceWith 6.5% Tax
    Cockpit/Frame$500$532.50
    Seat$995$1,059.68
    Steering Wheel$800$852.00
    Pedals$350$372.75
    TV/Display$1,000$1,065.00
    PC (Custom Build)$4,300$4,579.50

    Total: ~$8,461.43

    That’s a lot, but since I already have a monitor and PC, I’d only need to buy the cockpit, seat, wheel, and pedals. That cuts the cost down to about $2,900 with tax.


    The Space Problem

    The one thing holding me back right now is space. I don’t have a huge room, so I’d need to get creative to make it fit. The GTElite Lite Cockpit is pretty compact, but I’d probably have to move some furniture around and maybe wall-mount the monitor to make it work. It’s not impossible, just something I’ll have to plan out.


    Why This Makes Sense for Me

    Roberto’s M2 was his way of connecting to driving, and now his sim fills that same void. For me, I’ve been thinking about buying a track car, but this might be a smarter way to start. No extra bills, no surprise maintenance costs, no stressing about where to park it. A racing sim is about as close as you can get to the real thing without owning a car.


    Putting It All Together

    If you’re thinking about building your own rig, here’s what I’d do:

    1. Figure Out Your Space: Measure your room and figure out where everything will go.
    2. Buy the Gear: Focus on quality for the cockpit, seat, wheel, and pedals.
    3. Set It Up: Assemble the cockpit, mount the seat, and attach the wheel and pedals.
    4. Connect It All: Hook up your display and PC, and calibrate everything.
    5. Start Racing: Fire it up and hit the track.

    I’m still deciding if this is the right move for me, but it’s looking more and more tempting. What about you? Are you thinking about building a sim rig, or maybe you’ve already got one? I’d love to hear your setup ideas—or any tips if you’ve already done this before. Let me know in the comments!

  • How to Migrate Part-DB SQLite Data to WooCommerce Products

    How to Migrate Part-DB SQLite Data to WooCommerce Products

    Reading Time: 4 minutes

    Migrating data from one platform to another can feel overwhelming, especially when moving from a specialized tool like Part-DB to WooCommerce. However, with careful planning, a solid grasp of SQL, and the right tools, the process is straightforward. My recent experience migrating my inventory taught me that what might seem complex at first is entirely achievable with the right approach.

    Part-DB is excellent for internal inventory management but lacks the tools to make your data publicly accessible. WooCommerce, on the other hand, is a robust e-commerce platform designed to display products online, manage stock, and facilitate sales. By moving my inventory to WooCommerce, I was able to make my data accessible on my website, CollierComputers.com. Here’s how I accomplished the migration.

    Why Migrate from Part-DB to WooCommerce

    While Part-DB excels at organizing inventory for internal use, it doesn’t offer a public-facing interface. As my website, CollierComputers.com, began to take shape, it became clear that WooCommerce was a better choice for showcasing my inventory to the world. Its flexibility, ease of use, and e-commerce features made it the obvious next step.

    The migration wasn’t just about moving data; it was about making my inventory available to visitors, giving them a way to explore and engage with the collection I’ve been building over the years.

    Preparing for the Migration

    To start the process, I had to bring my Part-DB server back online. After months of being powered down, it needed a little attention. Once it was running, I transferred the SQLite database containing all my inventory data to my local machine.

    With the database file in hand, I installed DB Browser for SQLite. This tool provided an easy way to analyze the database and identify the fields I needed for WooCommerce. This preparation stage was essential to ensure the migration would go smoothly.

    Mapping Data for WooCommerce

    To successfully migrate the data, I needed to understand WooCommerce’s product structure. I began by exporting two products I had already added to WooCommerce to study the required fields. These exports served as a template, helping me identify critical fields like product name, price, and stock quantity.

    Using the exported data as a guide, I mapped the fields in Part-DB to those required by WooCommerce. This step was crucial to ensure the imported data would display correctly on my site.

    Writing the SQL Query

    The next step was creating an SQL query to extract the data from the Part-DB database. Since Part-DB’s structure didn’t directly align with WooCommerce’s import format, this required some trial and error. My focus was on pulling key information like product names, prices, and stock quantities while ensuring consistency across all 176 products.

    Crafting the query was time-intensive but rewarding. By the end, I had a properly formatted dataset ready for import into WooCommerce. See the code block below for an example of the SQL code I used for my needs:

    WITH RankedAttributes AS (
        SELECT DISTINCT
            p.name AS "Name", 
            p.description AS "Short Description", 
            CASE 
                WHEN c.name = 'Computers' THEN c.name
                ELSE 'Computers > ' || c.name
            END AS "Categories",
            pa.name AS "Attribute Name", 
            pa.value_text AS "Attribute Value", 
            p.manufacturer_product_number AS "Manufacturer Product Number",
            ROW_NUMBER() OVER (PARTITION BY p.name ORDER BY pa.name) AS row_num,
            CASE
                WHEN a.path LIKE '%/part/%' THEN REPLACE(a.path, '%MEDIA%', 'https://example.com/media')
                ELSE NULL
            END AS "Full Image URL"
        FROM parts p
        INNER JOIN categories c
            ON c.ID = p.id_category
        LEFT JOIN attachments a
            ON a.id = p.id_preview_attachment
        LEFT JOIN parameters pa
            ON a.element_id = pa.element_id
    ),
    AllImages AS (
        SELECT DISTINCT
            Name,
            "Full Image URL"
        FROM RankedAttributes
        WHERE "Full Image URL" IS NOT NULL
    ),
    ConcatenatedImages AS (
        SELECT 
            Name,
            GROUP_CONCAT("Full Image URL", ', ') AS "Images"
        FROM AllImages
        GROUP BY Name
    ),
    UniqueSKUs AS (
        SELECT DISTINCT
            Name,
            LOWER(REPLACE(Name, ' ', '-')) || '-' || CAST(DENSE_RANK() OVER (ORDER BY Name) AS VARCHAR) AS SKU
        FROM parts
    ),
    PartStock AS (
        SELECT 
            p.name AS "Name",
            CAST(SUM(pl.amount) AS INT) AS "Stock"
        FROM parts p
        LEFT JOIN part_lots pl
            ON p.id = pl.id_part
        GROUP BY p.name
    ),
    PurchaseNotes AS (
        SELECT
            p.name AS "Name",
            GROUP_CONCAT(
                CASE 
                    WHEN pd.price IS NOT NULL THEN 
                        'Purchase Price: $' || CAST(pd.price AS TEXT) || 
                        COALESCE(', Supplier Part Number: ' || od.supplierpartnr, '') || 
                        COALESCE(', Supplier URL: ' || od.supplier_product_url, '')
                    ELSE NULL
                END, '; '
            ) AS "Purchase Note"
        FROM parts p
        LEFT JOIN pricedetails pd
            ON p.id = pd.orderdetails_id
        LEFT JOIN orderdetails od
            ON p.id = od.part_id
        GROUP BY p.name
    )
    SELECT DISTINCT
        ra.Name, 
        ra."Short Description", 
        ra.Categories,
        GROUP_CONCAT(ra.Tags, ', ') AS "Tags",
        ra."Manufacturer Product Number",
        us.SKU,
        ci."Images",
        ps."Stock",
        pn."Purchase Note",
        MAX(CASE WHEN row_num = 1 THEN "Attribute Name" END) AS "Attribute 1 name",
        MAX(CASE WHEN row_num = 1 THEN "Attribute Value" END) AS "Attribute 1 value(s)",
        MAX(CASE WHEN row_num = 1 THEN 1 ELSE NULL END) AS "Attribute 1 visible",
        MAX(CASE WHEN row_num = 1 THEN 0 ELSE NULL END) AS "Attribute 1 global"
        -- Add additional attributes as needed
    FROM RankedAttributes ra
    LEFT JOIN ConcatenatedImages ci
        ON ra.Name = ci.Name
    LEFT JOIN UniqueSKUs us
        ON ra.Name = us.Name
    LEFT JOIN PartStock ps
        ON ra.Name = ps.Name
    LEFT JOIN PurchaseNotes pn
        ON ra.Name = pn.Name
    GROUP BY ra.Name, ra."Short Description", ra.Categories, ra."Manufacturer Product Number", us.SKU, ci."Images", ps."Stock", pn."Purchase Note";

    Importing Data to WooCommerce

    With the data prepared, I used WooCommerce’s built-in import tool to upload the products. This step was surprisingly smooth, though the upload process took longer than expected due to the number of products being imported. Watching the progress bar move slowly was a test of patience, but it was worth it when I saw the products appear on CollierComputers.com.

    After the upload, I spent time verifying the data on the site. Ensuring the accuracy of each product listing was a meticulous but necessary step to ensure the migration’s success.

    Lessons Learned

    This migration reaffirmed the importance of planning, preparation, and understanding the tools at hand. Breaking the process into manageable steps made it much easier to navigate. SQL knowledge was indispensable for extracting and preparing the data efficiently.

    By moving to WooCommerce, I not only improved the way I manage inventory but also made my collection accessible to visitors. The ability to display my inventory online opens new possibilities for sharing and engaging with my audience.

    Final Thoughts

    Migrating from Part-DB to WooCommerce was a game-changer for my workflow and my website. The process required effort and patience, but the result—a fully accessible, public-facing inventory—is well worth it. For anyone considering a similar migration, I encourage you to take the leap. With the right preparation and tools, it’s entirely within reach.

  • Why I Can’t Live Without Ubuntu Right Now

    Why I Can’t Live Without Ubuntu Right Now

    Reading Time: 2 minutes

    My journey with Linux began in the early 2000s when I first experimented with Red Hat and CentOS. Back then, getting a Linux desktop environment to work—especially with video drivers—was a challenge that sometimes took days to figure out. While I managed to set it up successfully, I always found myself switching back to Windows for one reason or another.

    Over time, moving to macOS helped me distance myself from Windows altogether. However, the push toward Windows 11 became the final straw. Privacy concerns, intrusive tracking, and the potential loss of local accounts made me pause. While local accounts are still supported, I couldn’t ignore the direction Microsoft seemed to be heading.

    Having used Ubuntu Server extensively for my home systems, transitioning to Ubuntu Desktop felt like a natural next step—and it’s been a rewarding change. Let me share why Ubuntu is now the operating system I rely on every day.

    How I Use Ubuntu Desktop Every Day

    While many people think of Linux as primarily a work-focused operating system, my main use for Ubuntu Desktop is gaming. Right now, I’m in the middle of an epic game of Civilization V, which runs smoothly on Ubuntu. Gaming on Linux has come a long way, thanks to tools like Proton and Steam Play, making it easy to run many Windows games natively or through compatibility layers.

    I’ve also experimented with photo editing on Ubuntu, but this is one area where the OS falls short for my workflow. Adobe doesn’t make its products, like Lightroom or Photoshop, accessible on Linux. While there are open-source alternatives like GIMP, they don’t fully meet my needs. For now, I use my Mac for photo editing, where Adobe’s tools run seamlessly.

    Challenges with Ubuntu Desktop

    Despite how far Ubuntu has come, there are still a few challenges I face. One of the biggest is managing display resolutions. I use an ultrawide 49-inch monitor, and while Ubuntu supports the resolution I need (5180x[fill in the specific height]), the settings don’t save after a restart. Each time I boot up, I have to manually adjust the resolution, which can be frustrating.

    Another limitation is the lack of native support for some professional software, particularly in creative fields. As mentioned earlier, Adobe’s absence on Linux means I have to switch to macOS for any photo or design work. While there are alternative tools, they don’t quite match the level of functionality I need.

    Why I’m Sticking with Ubuntu

    Even with these challenges, I’m committed to sticking with Ubuntu Desktop for one primary reason: privacy. Unlike Windows, which increasingly feels like it’s more about collecting data than empowering users, Ubuntu puts me in control. I’m not forced into using cloud services or sacrificing privacy just to use my system.

    As long as I can continue to play the games I enjoy and work around the few quirks I’ve encountered, Ubuntu will remain my OS of choice. The setup process today is leagues ahead of what it was 20 years ago. It’s fluid, detailed, and offers a ton of customization options, making it easier than ever for anyone to get started with Linux.

  • The Challenge of Storing my Growing Tech Collection

    The Challenge of Storing my Growing Tech Collection

    Reading Time: 7 minutes

    Tech collection management can be a daunting task as your inventory of spare parts and components grows. In this post, I’ll share strategies for organizing and cataloging my collection effectively.

    Each time I dive into computer building, I end up with a pile of spare parts, whether from upgrades or restoration projects. Over the past 4–5 years, I’ve transitioned from upgrading individual components to collecting and building used computers, which has led to a significant accumulation of spare parts and components. Managing and organizing this growing collection has become a challenge, requiring a thoughtful approach to storage and documentation.

    To address this, I’ve explored solutions ranging from spreadsheet tracking to inventory software, but I’m now leaning toward using WordPress with WooCommerce to catalog my parts. This allows me to stay organized and even consider selling items to interested buyers. In this post, I’ll share the strategies I’ve developed for storing and tracking components, from hard drives and GPUs to other essential parts, along with tips for documenting inventory effectively.

    The Growth of my Tech Collection

    My tech collection has grown steadily over time, starting with leftover parts from upgrades. I rarely sell my older components, keeping them for potential future use—just in case I might need them for another build. Recently, my focus has shifted from upgrading to collecting older computers to restore and upgrading their parts as needed. This transition has significantly expanded my inventory and introduced new challenges in managing and organizing it effectively.

    Before, during, and after any major tech upgrade, my office space transforms into a chaotic mess. Components and wires spill out onto every surface, with cables dangling off the edges of desks and tables. Building and upgrading computers is the fun part—until it comes time to clean up. The clutter can quickly become overwhelming, and I often find myself putting off the task of organizing for days or even weeks until I finally muster the energy to tackle it.

    As my collection grew, it became clear that a casual approach to storage wasn’t going to cut it. Tossing components into random drawers or stacking computers in a corner only added to the confusion and made it harder to find what I needed. This realization pushed me to explore more structured methods for organizing and tracking my inventory, which has been a game-changer for managing my collection.

    The Challenges of Managing Inventory

    Managing a growing tech collection isn’t as simple as putting everything into a box. Computer parts come in all shapes and sizes, with varying levels of sensitivity. Hard drives and GPUs require extra care to avoid damage, while bulky items like power supplies and cases take up significant space. Smaller components—like screws, adapters, and cables—are frustratingly easy to misplace. Without proper storage solutions, keeping track of everything can quickly spiral out of control.

    I’ve lost count of how many times I’ve purchased cables I thought I needed, only to discover later that I already had the exact item tucked away in a drawer or storage bin. It’s not just frustrating—it’s also a waste of money. This has taught me that while building and collecting computers is rewarding, managing the associated inventory requires a system to avoid unnecessary expenses and wasted time.

    Storage issues don’t just cost money—they can lead to irreparable damage to valuable items. I learned this lesson the hard way when I found some older tech stashed in a duffle bag I’d used for storage. Among the items was my old blue Omega external Zip drive, a nostalgic piece from my early computing days. Unfortunately, the drive’s case was cracked in multiple places, and the motor was completely compromised. It was beyond repair, and my only recourse was to buy a replacement on eBay purely for sentimental reasons. That experience was a wake-up call: if I wanted to preserve the integrity of my collection, I needed to rethink how I stored my equipment.

    These experiences made it clear that organization and proper storage are essential for managing a tech collection effectively. Without them, it’s easy to lose items, waste money, or even damage equipment that holds personal or financial value. Establishing a system has become a necessity, not just for convenience but for protecting my growing collection.

    Exploring Solutions for Inventory Management

    To address the challenges of managing my growing collection, I’ve tried various tools and approaches, each with its strengths and limitations. Traditional solutions like Excel spreadsheets are functional for basic inventory tracking, but they lack the user interface I need to make the process intuitive or enjoyable. Seeing a plain list of items doesn’t meet my needs, especially when I want to showcase my collection visually or add rich details like photos, descriptions, and specifications.

    I also experimented with PartsDB, an open-source inventory system I could self-host. It was great for keeping track of my inventory privately, offering fields for product descriptions, images, and technical specifications. The interface provided exactly the kind of detail I wanted when managing items internally. However, PartsDB wasn’t designed to be shared with others, which made it less ideal for a collector like me who occasionally wants to display items or write about them. While I appreciated its functionality, it didn’t fully align with my vision for creating a platform that could serve both as an inventory system and a way to share my journey with others.

    That’s where WordPress and WooCommerce come in. While WooCommerce is primarily an e-commerce platform, it offers a level of flexibility that fits my needs perfectly. By integrating it with WordPress, I can catalog my tech collection in a way that’s both functional and visually appealing. Each product can feature photos, specifications, and detailed descriptions, making it easy to organize and showcase my inventory. At the same time, WordPress allows me to write blog posts about my experiences, whether it’s the challenges of managing inventory, restoring a particular item, or the unique stories behind the pieces I’ve collected.

    For now, I’m moving forward with WordPress and WooCommerce as the foundation for my system. They provide the structure I need for managing my inventory, the flexibility to share my collection with others, and the tools to document my experiences along the way. As I continue refining my approach, I look forward to building a platform that combines inventory management with storytelling—a system that’s as rewarding to use as the hobby itself.

    Key Activities for Managing Inventory 

    My process for managing inventory involves several key steps to ensure each component is properly documented, organized, and ready for potential use or display. Here’s how I approach it:

    1. Preparation and Cleaning:
      Before adding a component to my inventory, I make sure it’s physically accessible and clean. Whether it’s a GPU, hard drive, or other component, I want it to look its best for both documentation and potential display.
    2. Photography and Post-Processing:
      Once cleaned, I photograph the component to capture it from multiple angles. High-quality images not only showcase the product but also provide a visual reference for specifications and condition. After photographing, I post-process the images to enhance clarity, correct lighting, and add watermarks as needed. This step ensures my collection looks polished and professional.
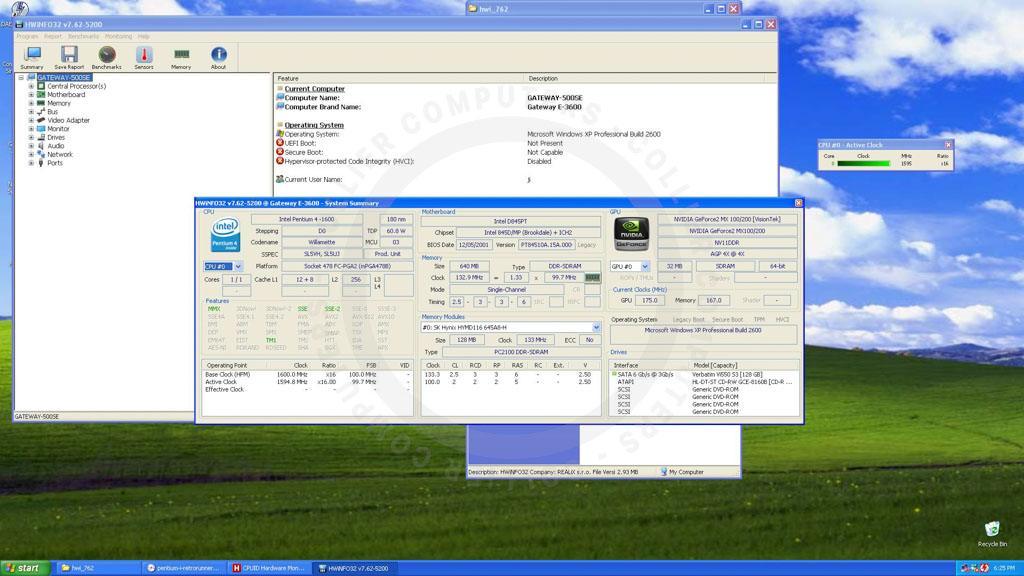
    3. Gathering Product Specifications:
      After photographing the item, I research and compile its specifications. Reliable sources like Amazon, Newegg, and the manufacturer’s website help me ensure the details are accurate and comprehensive. Including information like model numbers, dimensions, compatibility, and performance specifications makes each entry as useful as possible.
    4. Categorization and Organization:
      Each product is categorized appropriately (e.g., GPUs, CPUs, storage drives) to make searching and filtering easier. This step is crucial for maintaining a structured inventory system, especially as the collection grows. On platforms like WooCommerce, categorization also supports better navigation for potential buyers.
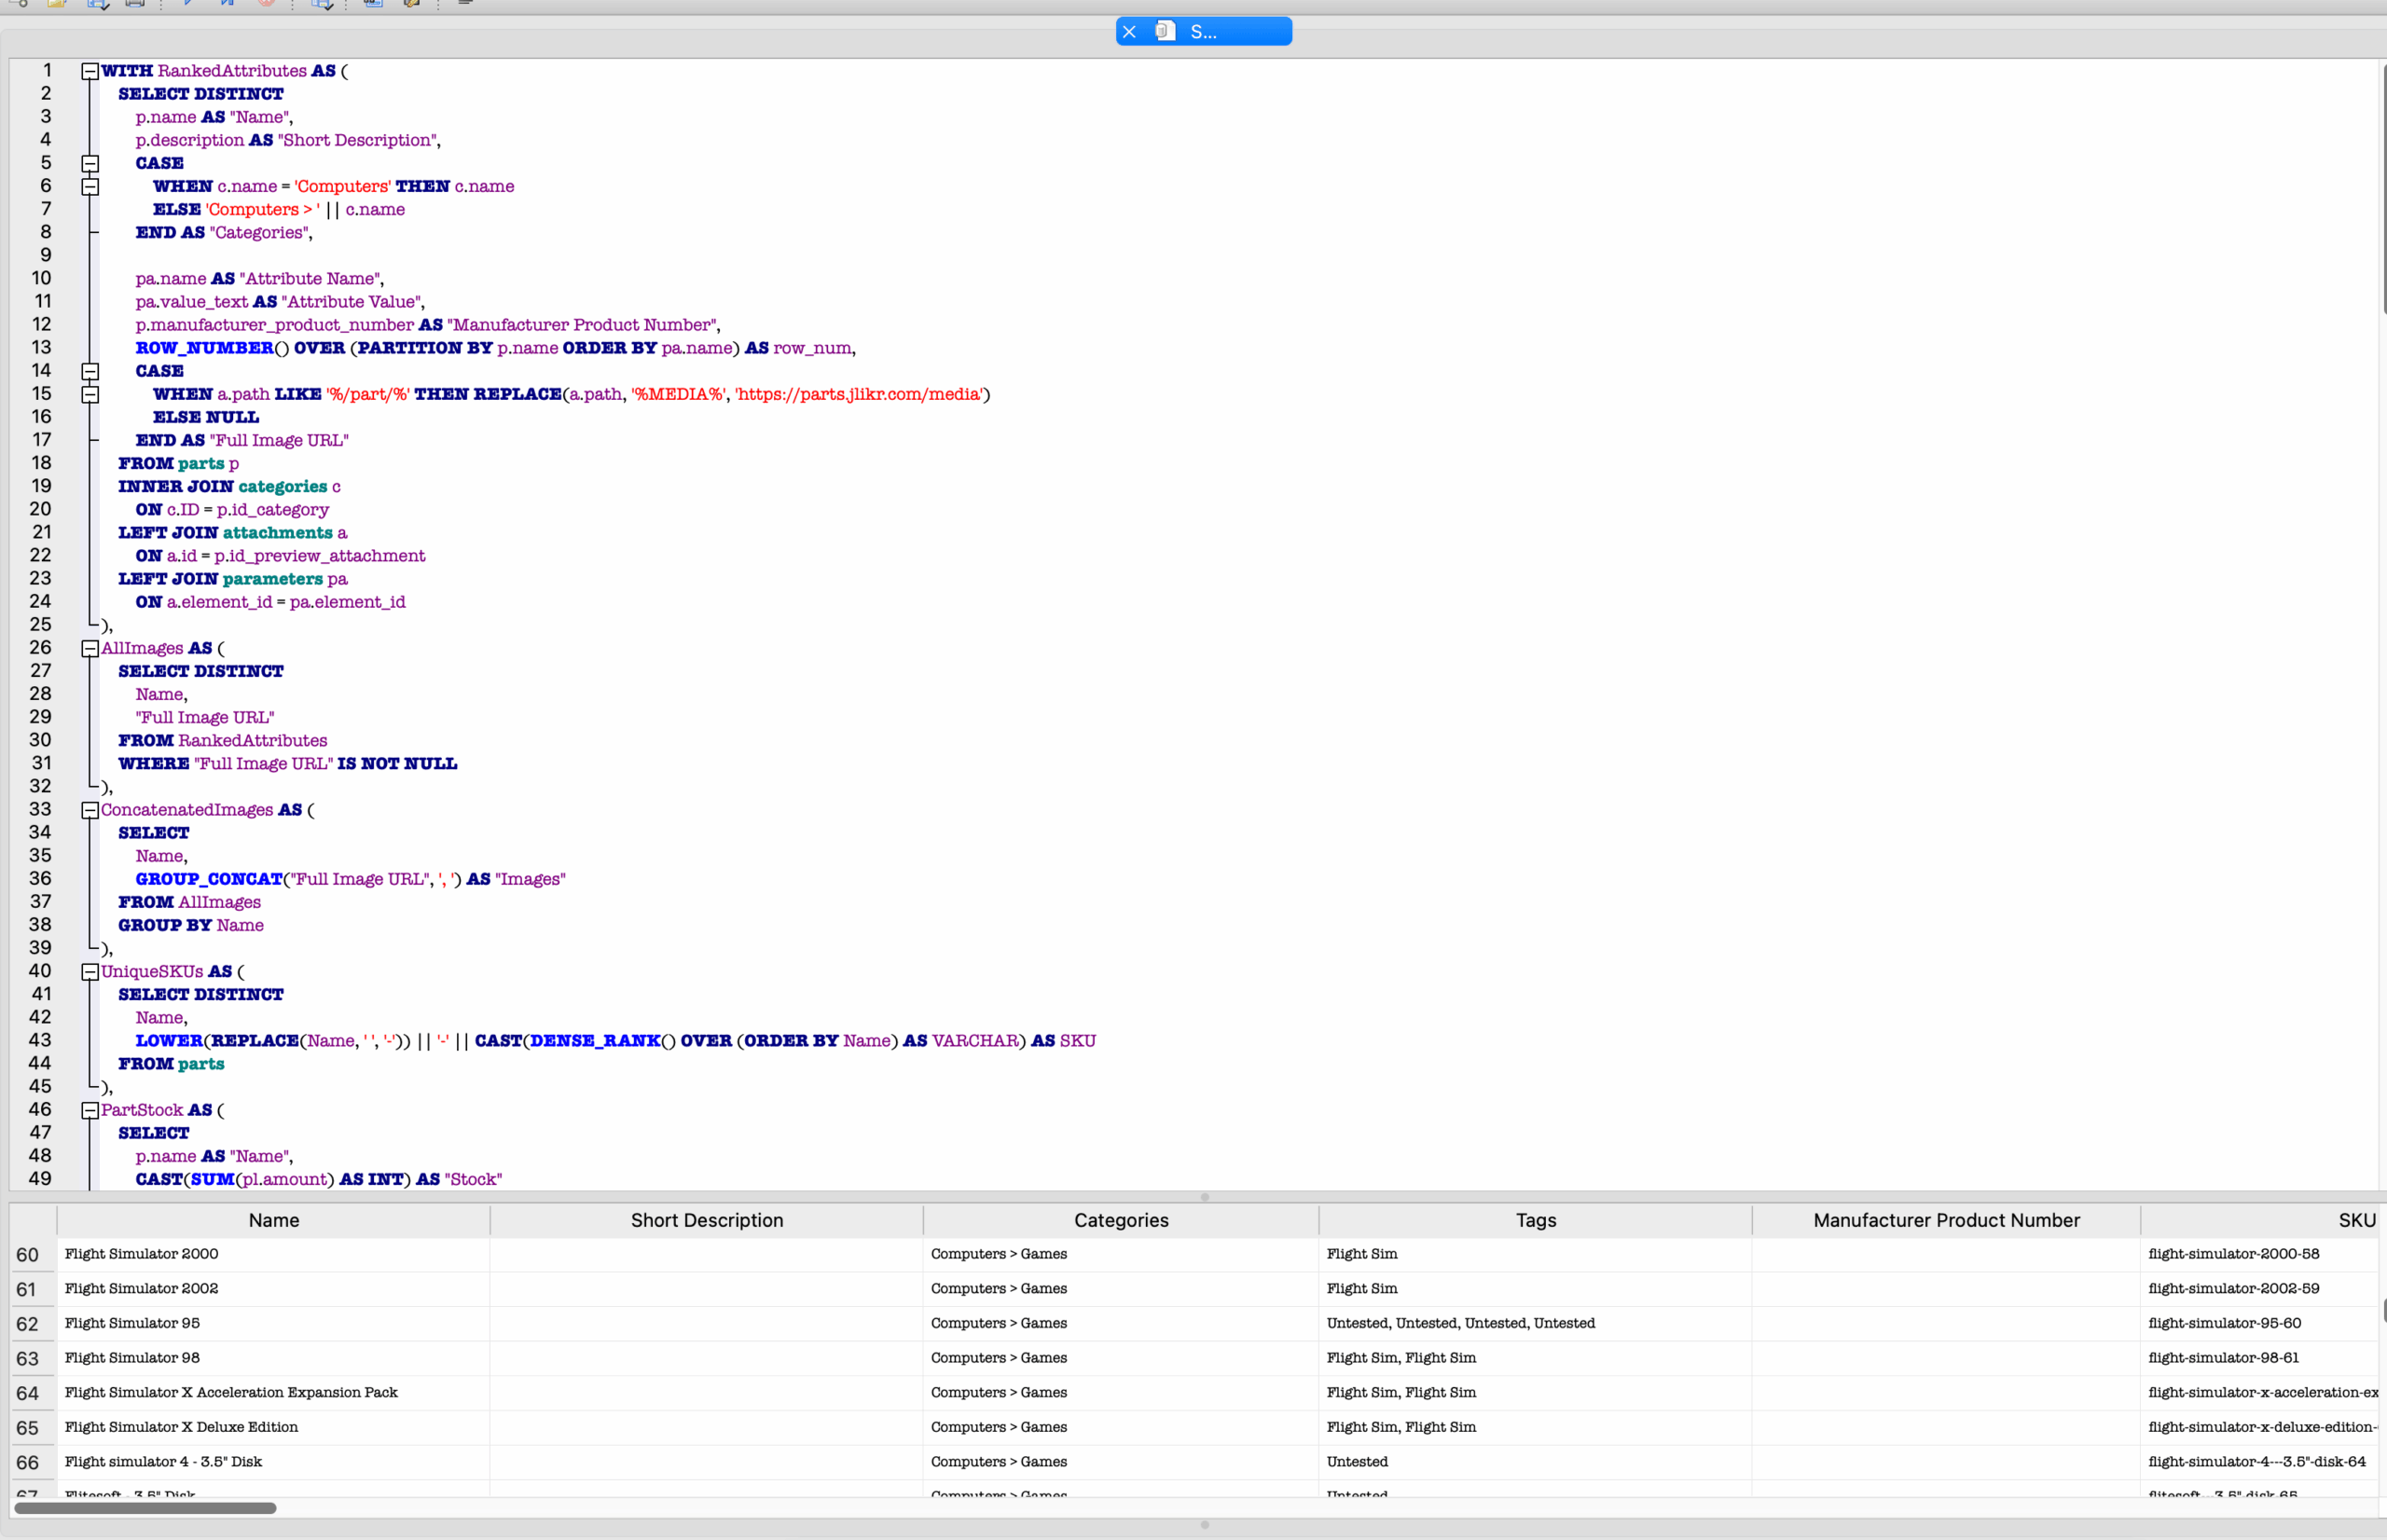
    5. Creating and Maintaining the Inventory List:
      By the end of this process, I have a complete, searchable inventory list organized by category. WooCommerce adds another layer of functionality, allowing me to manage the list effectively and even sell items if I choose to. This dual-purpose approach keeps my inventory system flexible and scalable for future needs.

    Storage Strategies for Specific Components

    Over time, I’ve accumulated a wide range of items, from hard drives and CPUs to RAM, laptops, and mobile devices, each requiring its own storage solution. Keeping these components organized and safely stored has become an essential part of managing my collection.
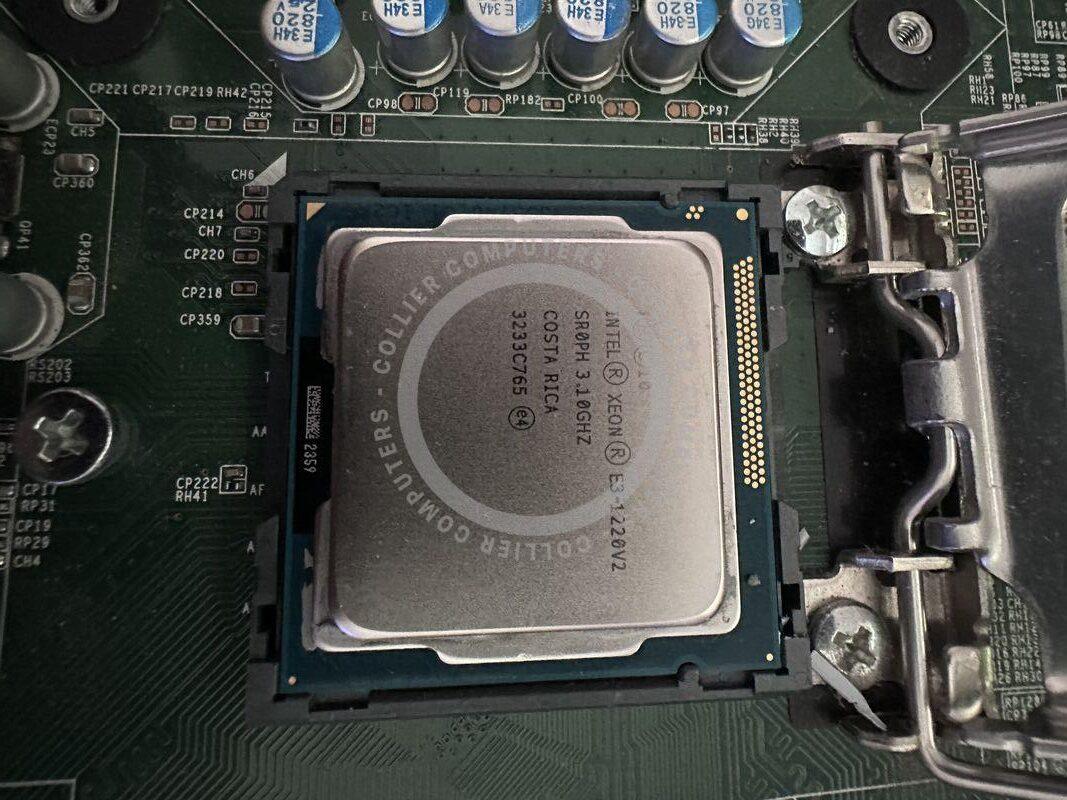
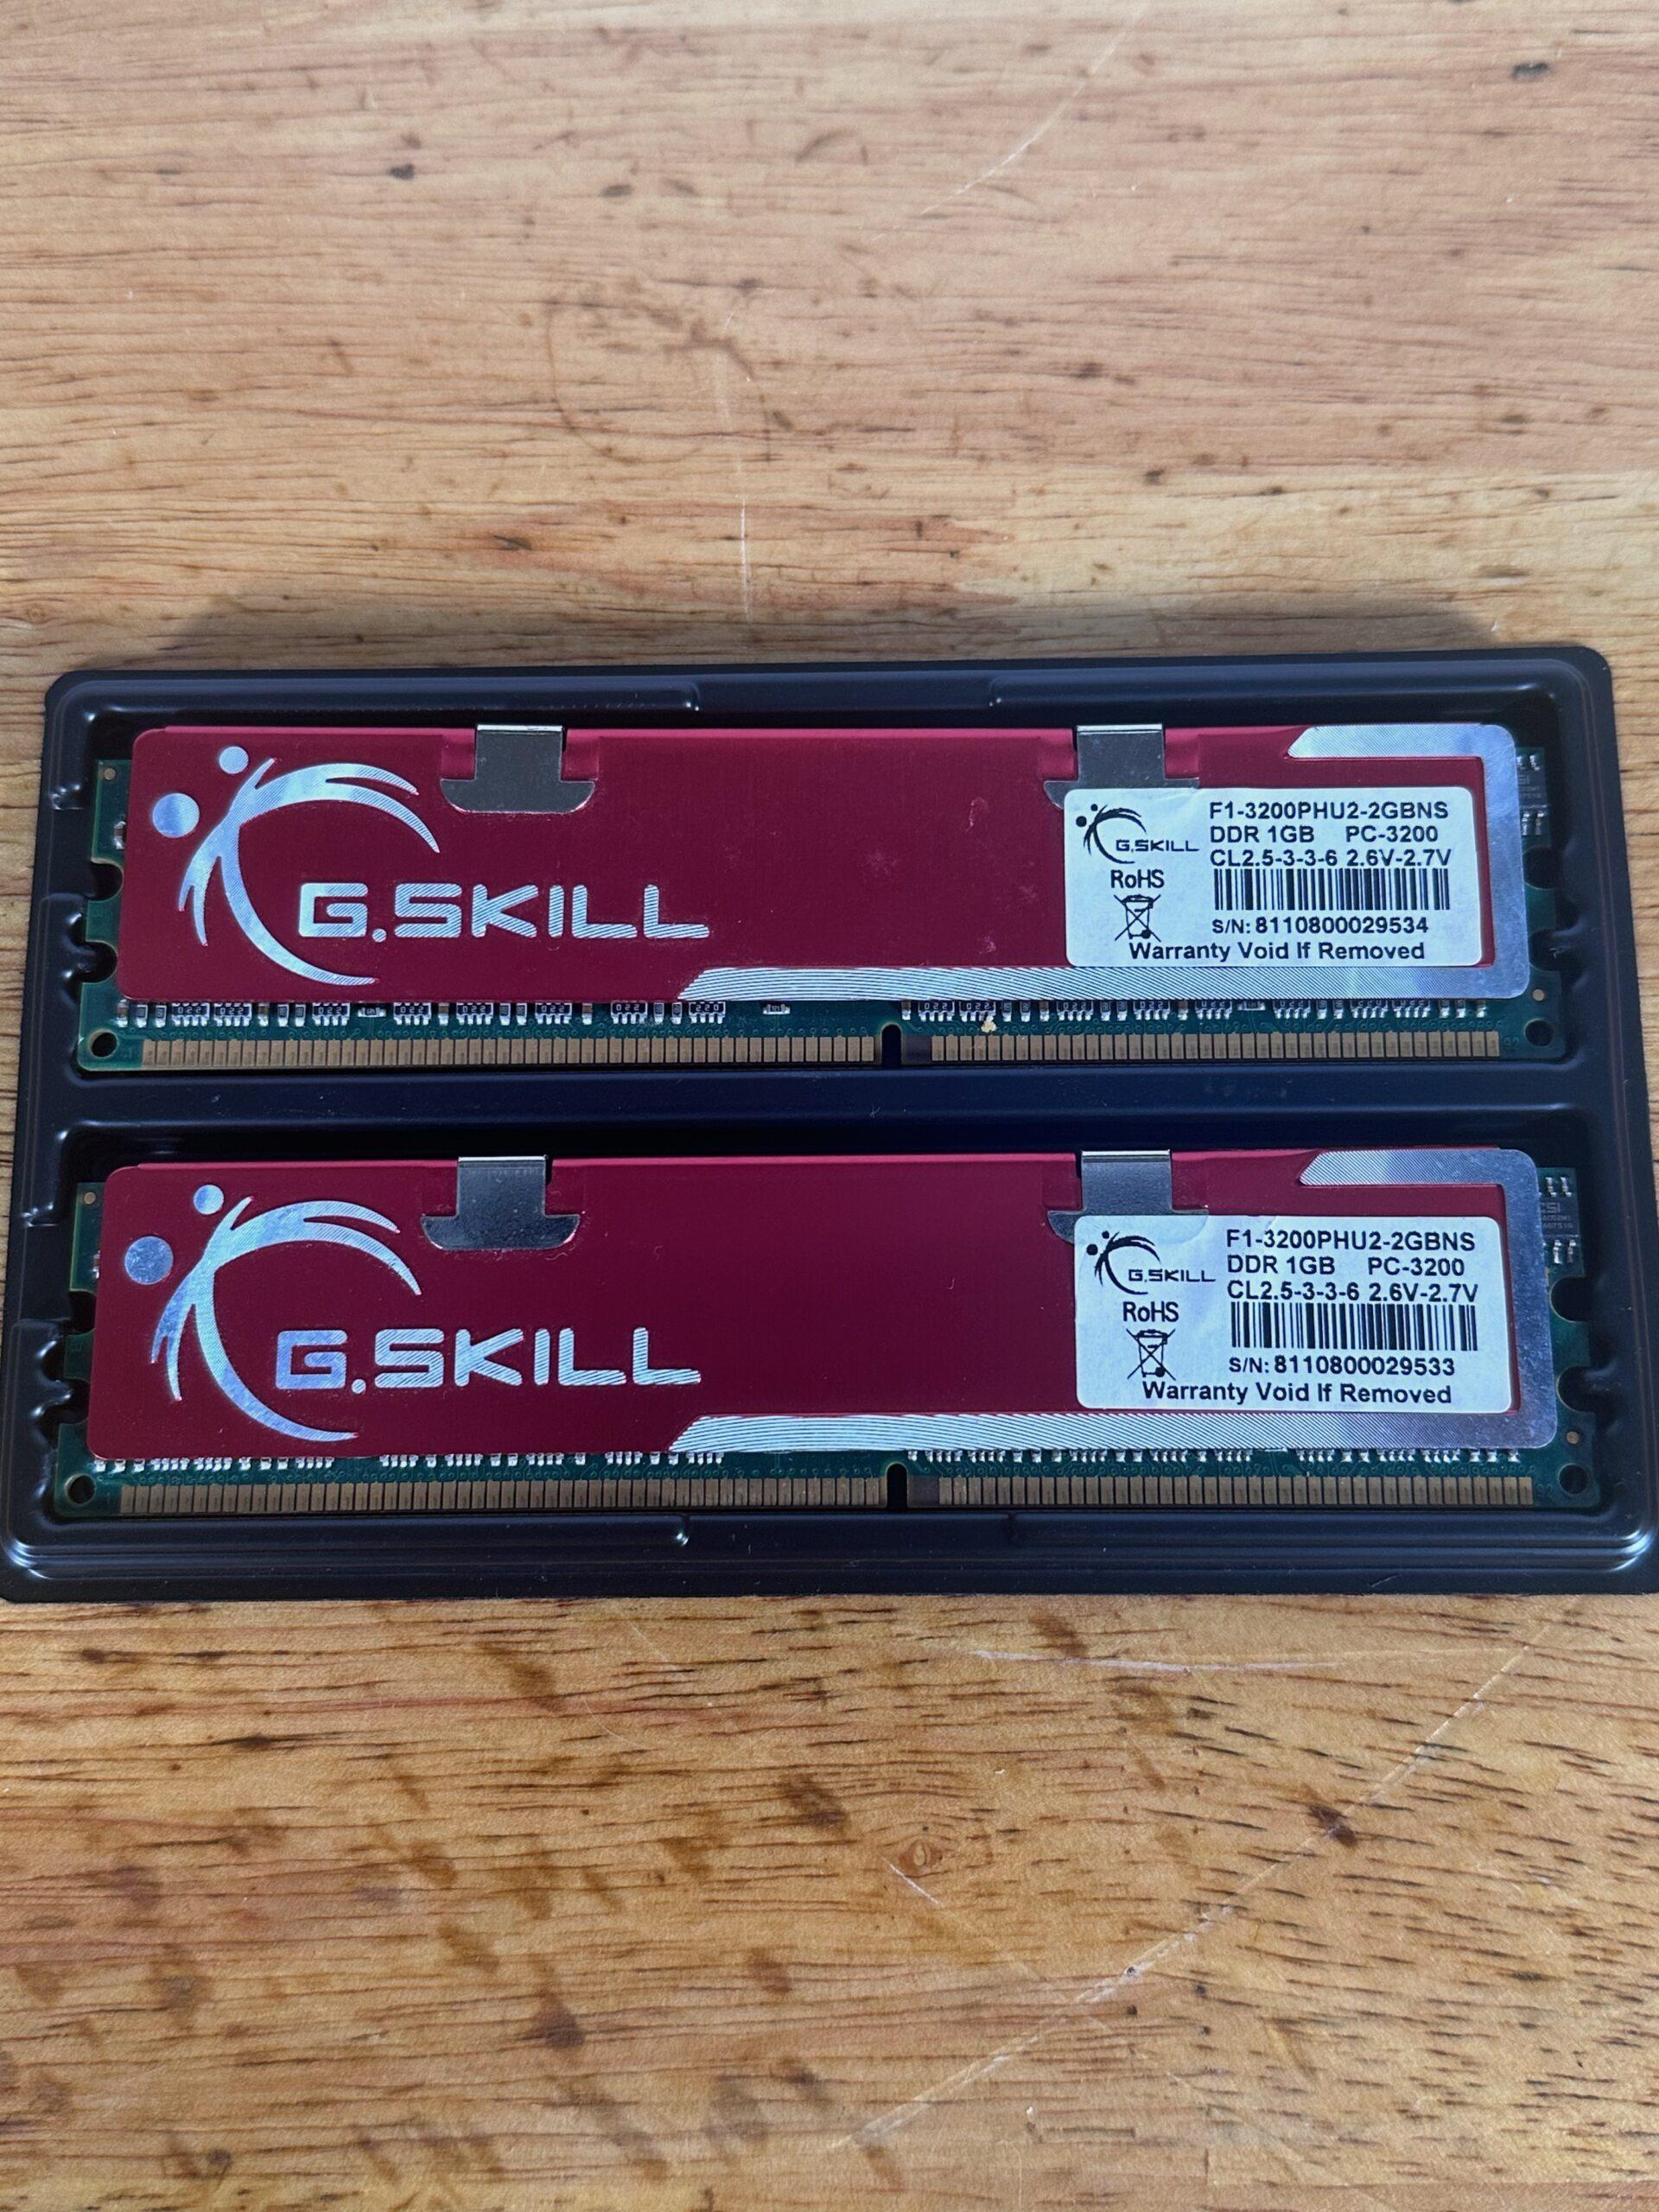
    CPUs and RAM:
    For sensitive items like CPUs and RAM, I invest in protective cases designed to keep them safe from dust, moisture, and accidental damage. If original packaging isn’t available, aftermarket cases or anti-static containers work well. These small items are easy to misplace, so having a dedicated box or drawer for them ensures they stay accessible and protected.

    Hard Drives:
    Hard drives are particularly sensitive to physical shocks and static, so I use anti-static bags for individual drives and store them in a dedicated drawer. As my collection grows and the drawer fills up, I may consider stacking organizers or expanding to a second storage solution to prevent overcrowding, which can lead to accidental damage.

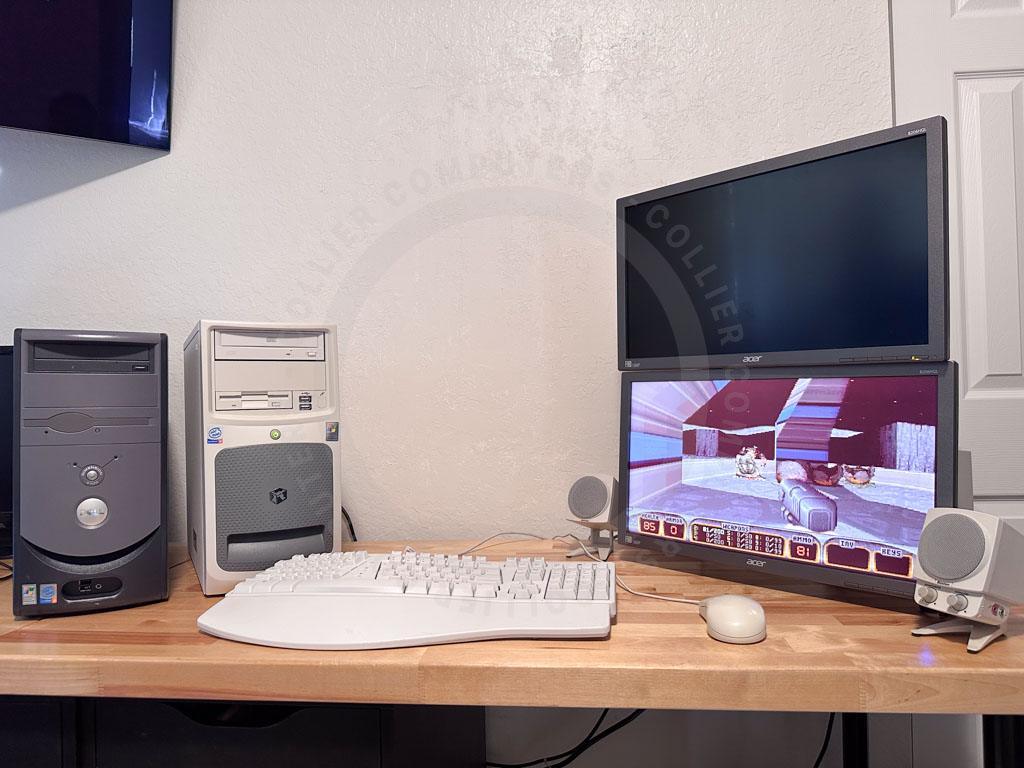
    Laptops and Mobile Devices:
    My laptops are stored on a dedicated shelf where they can be neatly stacked without risking scratches or other damage. Mobile devices, including phones and tablets, are kept in a labeled drawer, separated by type. This system makes it easy to locate specific items when needed and prevents unnecessary clutter.

    Cables and Accessories:
    Cables can quickly become a tangled mess, so I’ve developed a system to manage them effectively. USB cables, power cables, and Ethernet cables each have their own labeled storage containers. For USB cables specifically, I go a step further by grouping them into smaller bags based on type (e.g., USB-C, micro-USB, USB-A) for quick access. This not only keeps my workspace tidy but also saves time when I need a specific type of cable.

    Other Components:
    Items that don’t fit into the above categories, such as adapters, chargers, or specialty components, are stored in extra drawers. I categorize these drawers loosely by function (e.g., “chargers and adapters” or “miscellaneous components”) and label them for easy identification. Having extra space available for future storage needs ensures I can adapt as my collection grows.

    Proper storage and organization are critical for managing a growing tech collection. By developing thoughtful strategies for each type of component—whether it’s CPUs, hard drives, cables, or laptops—you can protect your items, reduce clutter, and make your collection easier to manage. As my own collection has grown, I’ve found that investing time and effort into storage solutions not only safeguards my equipment but also enhances my enjoyment of the hobby. Whether you’re just starting out or looking to refine your own system, I hope these tips inspire you to take your storage strategies to the next level.

    Documenting Inventory Details

    While I’m still in the process of setting up my inventory in WooCommerce, I’ve already started tracking essential details like item condition, location, and specifications. Once complete, WooCommerce will allow me to centralize this information and make my inventory both organized and visually appealing. This system will not only help me stay on top of my collection but also make it easier to share or sell items in the future.

    Looking Ahead: Selling and Decluttering

    As my inventory grows, I’ve started thinking about the potential for selling or decluttering parts of my collection. WooCommerce provides the flexibility to turn my catalog into a marketplace if I choose, giving me the option to share my tech with others while creating room for new additions. For now, my focus is on getting organized, but I see this as an exciting possibility down the road.

    Conclusion

    Managing a tech collection is an evolving process that requires both creativity and structure. As I’ve refined my storage and documentation strategies, I’ve found that organization not only protects my collection but also enhances my enjoyment of the hobby. Whether you’re just starting your own collection or looking to improve your system, I hope these tips inspire you to find solutions that work for you.

  • A Complete Workflow for Computer Product Photography

    A Complete Workflow for Computer Product Photography

    Reading Time: 7 minutes

    I’ve been passionate about PC building since the early-to-mid 1990s. I still remember upgrading my dad’s 486DX2—installing a Cyrix 586 CPU, adding RAM, and upgrading the hard drive multiple times to keep that computer running. Back then, documenting those upgrades with photos never crossed my mind. Even the first computer I built from scratch, in the early 2000s, only has a few scattered photos. They lack the level of detail I wish I had today, but back then, digital cameras weren’t as accessible, and computer product photography wasn’t something I considered.

    Fast forward to 2017, when I reignited my passion for PC building and restoring older computers. With advancements in technology—not just in hardware but in tools for creating and sharing digital content—I realized the importance of documenting my work. Computer product photography became a critical part of that process, allowing me to showcase the systems I restore in a professional way. Today, I immerse myself in every aspect of technology, from building and restoring to coding, designing, and sharing my projects through photography. This focus on computer product photography allows me to highlight my efforts, share my passion, and preserve the story of each build.

    Documenting computers isn’t just a simple point-and-shoot process. It’s a deliberate workflow—a series of steps that involves planning, capturing, and editing, each as important as the next. This computer product photography workflow ensures that my restored systems look professional, my work is preserved, and my passion reaches others through platforms like social media and my website.

    Why Documenting Matters

    For me, the real joy comes from being hands-on with computers—whether it’s building, upgrading, or restoring them. I love the process of assembling components, installing the operating system, and ensuring everything works perfectly by configuring the right drivers. Once that’s done, I might play a few games to test the system for a week or two, but soon, it’s on to the next project.

    Without documentation, though, all that effort becomes a fleeting memory. That’s why I make it a priority to capture the process. I take a lot of photos—before and after shots for restorations, detailed images of the computer case, motherboard, and individual components. This isn’t just for aesthetics; it’s also about creating a record of the computer’s build, whether it’s using original parts or upgraded components.

    Having detailed photos and notes serves multiple purposes. It helps me keep track of what’s inside each system, maintain an inventory of parts, and log what I spent on components. This information is invaluable if I decide to sell a part or the entire system—because I already have a visual and written history ready to go. It also makes it easy to share my builds on platforms like Facebook, Instagram, or Twitter, showcasing my work to a broader audience.

    Preparing for the Shoot

    Preparing for a photoshoot starts with a lot of planning. First, I think about what I’m shooting and why. Am I documenting new parts with their boxes or used components? Will I be taking before-and-after shots of a restoration, or focusing on the final build? Each purpose dictates a different approach, so clarity is key from the start.

    Next, I consider the setting. Where will I take the photos? Fortunately, I have a dedicated space in my house that works well for photographing computers and components. I’m also lucky to have some equipment on hand, like LED lighting and a ring light (which I repurpose as my tripod). These tools help create consistent lighting and reduce shadows, but sometimes I experiment with natural light depending on the mood I want to capture.

    Background is another crucial factor. A clean, uncluttered background keeps the focus on the computer or components, so I often use a white colored sheet as a portable backdrop. I also plan the framing and angles I’ll use, deciding which parts of the build to highlight. For instance, I might want to showcase the interior layout, upgraded GPUs, or unique case designs.

    Equipment preparation is just as important. I ensure my camera’s memory card is clear, batteries are fully charged, and lenses are clean and ready to go. I typically choose lenses based on the type of shots I want—for wide views, a standard zoom works well, but for detailed component shots, I’ll use a macro lens. I also keep a spreadsheet on my iPad Pro handy to track my camera settings (like aperture and shutter speed) so I can replicate or adjust the setup for future shoots.

    Finally, I organize my workspace to minimize distractions. This includes having all the components or computers laid out neatly, cleaning up any dust or smudges, and double-checking that everything I want to photograph is easily accessible. Good organization not only saves time but also ensures that every detail of the shoot is captured perfectly. With all the preparations complete—from planning shots to organizing equipment—I’m ready to bring my vision to life. Capturing the photos is where creativity and preparation meet, and it’s my favorite part of the process.

    Capturing the Photos

    Once my preparations are complete, it’s time to bring the plan to life. I use the checklist I created during setup as a guide to ensure I capture every shot I’ve planned. This includes standard angles, like the front, back, and sides of the computer, as well as more creative compositions. For example, I take diagonal shots from the front or back corners and remove the side panel to photograph the internal components. These varied perspectives help showcase the computer’s design and functionality.

    Retro computers, in particular, can be visually understated, so I make it a priority to highlight the details that make them unique. Close-ups of buttons, stickers, and ports help draw attention to the finer elements of the build. These shots not only add visual interest but also give viewers a clearer sense of the computer and its components, even if they’ve never seen them in person. By experimenting with creative angles, I aim to make even plain-looking systems feel dynamic and engaging.

    For equipment, I rely on my Canon 80D and three lenses: a standard zoom for wide shots, a macro lens for close-ups, and a wide-angle lens for full-system photos. The Canon Connect iOS app allows me to adjust settings and take photos remotely from my phone, making the process more efficient and precise. This flexibility is especially helpful when I’m focusing on intricate details or working in tight spaces.

    Before diving into the full shoot, I always take a few test shots. These help me fine-tune the lighting, focus, and framing, ensuring everything looks just right. While test shots are invaluable, the real magic often happens in post-processing, where I refine and enhance the images to bring out their best qualities. By combining a thorough plan with careful execution, I’m able to produce polished, professional photos that truly showcase each computer’s story.

    With the photos captured, the next step is to refine them into polished visuals that truly showcase the details of each build.

    Post-Processing

    Post-processing is where the magic happens, but it’s also an area where I’m still learning the ropes. Currently, I use the Adobe Photography Plan, which gives me access to Lightroom and Photoshop. While these tools are powerful and user-friendly, I’m not a fan of paying subscription fees, especially since I don’t use them every day. That’s why I’ve recently started exploring Darktable, an open-source alternative to Lightroom. Darktable has a steeper learning curve, but as someone who wants to deepen my photography skills, it feels like a worthwhile investment of time.

    Regardless of the software, my post-processing workflow focuses on a few key tasks. First, I adjust the brightness and contrast to ensure the photo is clear and visually appealing. Then, I straighten the image if needed, which is particularly important for computer photos to maintain a clean, professional look. Next, I apply a watermark to protect my work and maintain a consistent brand identity. Finally, I export the photo in the appropriate resolution and format for its intended use—whether it’s for my website, social media, or another platform.

    One area I’m experimenting with is batch processing. While it’s tempting to automate the editing process, I find that many photos require individual attention, especially when it comes to fine-tuning details like color balance or cropping. My goal is to strike a balance between efficiency and quality, perhaps by developing a hybrid approach where I apply basic edits in bulk but still review each photo for manual adjustments.

    Post-processing isn’t just about making photos look better; it’s about bringing out the best in each shot. Whether it’s emphasizing the shine of a retro case or enhancing the colors of a motherboard, the editing process helps tell the story of the computer in a way that raw images simply can’t.

    Once the images are edited and polished, they’re ready to be shared. For me, publishing these photos isn’t just about displaying my work—it’s about connecting with others and preserving the story of each computer I restore.

    Publishing and Sharing

    After completing the post-processing, the next step is to share the results. Right now, my primary platform is this website, where I showcase both the photos and detailed information about each computer. It’s a space to document my work, reflect on my progress, and share my passion for computer restoration with others who might have similar interests.

    In the future, I’d love to expand beyond my website. Platforms like Instagram and marketplaces such as eBay or Facebook Marketplace could be great opportunities—not just for sharing my photography but also for connecting with potential buyers if I ever decide to sell my computers. These platforms allow for more interaction and visibility, turning each post into a way to engage with the broader tech community.

    That said, one of my biggest challenges right now is organization. Deciding where to save original files versus post-processed images and maintaining a clear folder structure can be overwhelming, especially as my library grows. I’m working on creating a system that keeps everything accessible and well-labeled, so I can find and repurpose content easily when needed.

    Ultimately, the goal of publishing my work is twofold. First, it’s a personal archive—a way for me to revisit my projects and see how far I’ve come. Second, it’s a way to inspire and connect with others who share a love for retro tech, computer components, and creative photography. As I continue refining my workflow, I’m excited to see how sharing my work evolves and the kinds of connections it might foster.

    Publishing my photos is the culmination of everything I love about this process: the creativity, the technical challenges, and the joy of sharing my passion with others. Whether I’m showcasing a fully restored retro PC or diving into the details of a motherboard, each post is a chance to preserve the story of a computer and connect with a community that shares my enthusiasm. As I continue refining my workflow and exploring new platforms, I’m excited to see where this journey takes me—both as a photographer and as someone who loves breathing new life into old technology.

    Each photo I take is more than just an image—it’s a way to document the countless hours spent restoring a piece of technology to its former glory. Sharing these moments allows me to connect with others who appreciate the history and artistry of computers, while also building a personal archive that inspires me to keep growing.

  • Why Restoring Computers Isn’t as Simple as It Seems

    Why Restoring Computers Isn’t as Simple as It Seems

    Reading Time: 5 minutes

    I’m passionate about computers, anything and everything about them interests me. However, over the last few years, restoring computers from the 90s and early 2000s, like those running MS-DOS, Windows 3.1, Windows 95, Windows 98, and Windows XP, has been one of my favorite hobbies. This passion inspired me to create a website to showcase my builds, colliercomputers.com. While assembling cutting-edge PCs with the latest technology is exciting, I find immense joy in bringing vintage systems back to life. Some retro machines hold a special charm, and with an abundance of parts and games on the used market, the hobby is both accessible and rewarding. Restoring computers isn’t as simple as it seems. The journey can be rewarding, yet the high cost of sought-after components, recurring hardware compatibility issues, and the ongoing struggle to locate the correct software drivers add significant complexity to the process.

    The Surprising Cost of Retro PC Components

    Restoring a retro PC from the 90s or early 2000s might sound like a straightforward project—grab an old machine, swap in some parts, and relive the glory days of computing. But as I’ve discovered, it’s not that simple. What I assumed would be a budget-friendly hobby quickly revealed hidden challenges: scarce components, sky-high prices, and the unpredictable condition of decades-old hardware. If you’re a computer builder who mods or upgrades your own PC, you’re likely familiar with the cost of modern parts and the thrill of scoring a deal. I figured upgrading a retro system with top-tier components would be cheap—maybe $100 to $300 total—but I was stunned to find 25-year-old GPUs selling for over $300. These unexpected hurdles have kept me from chasing the ultimate retro setup I envisioned.

    I consider myself a savvy shopper, and with enough patience, platforms like Facebook Marketplace can be goldmines for retro computing enthusiasts. Lurk long enough, and you might find people practically giving away old computers—sometimes even in working condition. But “working condition” is a gamble. The first retro PC I snagged was a Micron running Windows 95, complete with a monitor, for just $75. It seemed like a steal for a full setup, even though the seller admitted they couldn’t power it on or troubleshoot it. With my experience, I was confident I could revive it—and I did, but not without effort. Restoring these machines often means wrestling with degraded capacitors, dusty internals, or missing drivers, turning a “quick fix” into a time-consuming puzzle.

    Once I got the computer running, I decided to upgrade it, starting with the graphics card. For a 90s-era system, the Voodoo 3DFX is iconic—a holy grail for retro gamers. But when I checked eBay, I was floored: prices for these cards often exceed $500. It’s not just the Voodoo; other high-end components from that era, like the Intel Pentium III or Sound Blaster 16, carry premium price tags due to their rarity and nostalgia-driven demand. Sure, you can still find lower- and mid-tier hardware at reasonable prices, but building a top-of-the-line retro PC is a different story. The deeper I dug, the clearer it became: restoring a high-spec system from this era isn’t just about finding parts—it’s about navigating a market where scarcity and sentimentality inflate costs beyond reason.

    Hardware Compatibility Issues

    This is no different than the hardware compatibility issues from today, but ensuring retro computer component compatibility is not as straightforward. Thankfully, the internet and more recently, A.I. tools like ChatGPT have been a tremendous help in confirming compatibility, the challenge still exists. From 1990-2010, there were so many components released and not all components have been thoroughly documented.

    One of the most common struggles involves video cards. Early ISA and AGP video cards, for example, require specific slots, whereas newer PCI and PCI-E cards are entirely different standards. Ensuring your video card matches your motherboard is critical to avoid compatibility issues.

    Another major concern is power supply compatibility. Many older computers rely heavily on power supplies with a 5V rail to power key components like the motherboard and CPU. However, modern PSUs are designed to deliver more power on the 12V rail, which can overwhelm older hardware or fail to supply sufficient power to the components that need it most.

    Having spare components will be something that help you troubleshoot and tinker when it comes to computer component combinations.

    The Struggle with Software Drivers

    Rebuilding retro computers often means investing in specific components to ensure everything works as it should. However, even with the right hardware, software drivers can pose a significant challenge. For instance, a sound card designed for a specific vendor, like a Dell-branded sound card, may not function properly with another manufacturer’s system due to proprietary drivers or firmware.

    Driver compatibility isn’t just a hardware issue—it’s also a software availability problem. Many drivers for older systems are no longer supported by manufacturers and can be difficult to track down. This means relying on community forums, archival websites, or driver repositories to find the files you need. Even then, the drivers may not always work as expected or could require extensive troubleshooting to install on legacy operating systems.

    In some cases, enthusiasts turn to open-source driver projects or hardware emulation as a workaround, but these solutions aren’t always ideal or reliable. The challenge of finding and configuring the right drivers adds another layer of complexity to retro computing but also makes the eventual success all the more rewarding.

    Component Failures and Repairs

    Sometimes, components simply fail. This isn’t unique to retro computing—even modern hardware can arrive defective, which is why manufacturers offer RMA (Return Merchandise Authorization) processes for replacements or repairs.

    However, RMA options only apply to new products under warranty. When you’re buying used parts or a second-hand computer, you won’t have the safety net of an RMA. This means you’ll need to troubleshoot issues yourself and, in some cases, complete repairs to get the component working again.

    Over time, I’ve built up an inventory of spare parts specifically for these situations. Maintaining a stockpile of components—like motherboards, CPUs, RAM, and power supplies—has been invaluable when restoring older systems. Not only does it help speed up troubleshooting, but it also reduces downtime if I need to replace a part.

    That said, building an inventory comes with its own set of challenges. Finding parts in good working condition requires patience, and keeping everything organized can be tricky. I’ve learned to label and test components as I acquire them to ensure they’ll work when I need them.

    Despite the effort, having spare parts on hand is a game-changer, especially when working with rare or mission-critical hardware. It allows me to experiment, test different configurations, and keep retro systems running smoothly, even when the unexpected happens.

    Why It’s All Worth It

    For me, restoring computers is an incredibly rewarding experience. It starts with the joy of disassembling the machine, carefully reviewing its internal components, cleaning each part, and then reassembling everything. There’s something deeply satisfying about putting it all back together and seeing the system come to life.

    Equally enjoyable is the process of configuring the operating system and drivers to achieve a fully functional setup. Getting the video card to display proper resolution and colors, or ensuring the sound card delivers crisp audio, feels like solving a complex puzzle—challenging but immensely gratifying once complete.

    And then comes the best part: putting the restored system to the test with classic games. Whether it’s revisiting old favorites or discovering hidden gems, playing on a retro machine takes me back in time. For me, there’s nothing better than the combination of nostalgia and accomplishment that comes from bringing an old computer back to life and using it the way it was meant to be.

  • 2025 – Week 9: 3D Printing Revival, Rubik’s Cube Robot, and More

    2025 – Week 9: 3D Printing Revival, Rubik’s Cube Robot, and More

    Reading Time: 2 minutes

    Welcome to my Week 9 2025 Updates! This week was packed with projects pulling me in all directions, and I loved every minute of it.

    First up, I dusted off my Prusa 3D printer after what feels like forever—maybe a year, maybe two. I can’t even remember the last thing I printed, but I’m determined to bring it back to life. I started with some basic maintenance: cleaning and lubricating the z-rods. Then, I tried printing a Benchy (the classic 3D printing benchmark), but the results were less than stellar. The printer needs some serious tuning, and I’m still troubleshooting why it’s not laying down filament properly. Fingers crossed I’ll crack the code this week—stay tuned for progress!

    Next, I’ve been sketching out plans for an ambitious new project: a robot that solves a Rubik’s Cube. After building websites for so long, I’m ready to flex my skills on something tangible and mechanical. This robot will need a vision system to ‘see’ the cube, arms and grippers to manipulate it, plus a control system, power setup, and a sturdy structure. I’m particularly excited to use my freshly revived 3D printer to create the arms, grippers, and base. It’s a fun challenge, and I can’t wait to see it come together.

    On the digital front, I spent time enhancing my site, swfl.io, by adding a new Traffic page. Phase one was straightforward: integrating Google Maps with live traffic data. Phase two is where it gets interesting—I’m using my own AI setup to scrape news content from the site and extract traffic and event-related info. The proof of concept is working, though I’ve got a few bugs to squash. This project’s got legs, and I’ll keep refining it in the coming weeks.

    Oh, and I also dipped into graphic design this week, creating a business card for my landscaper. I used Adobe Express to design it and VistaPrint to get it printed. The cards should arrive soon, and I’ll share a photo once they’re in hand.

    That’s the rundown of my Week 9 2025 Updates. It was a whirlwind of 3D printing, robot planning, web dev, and design. Let’s see what I can tackle next week!