Benchmarking tools are essential for accurately measuring the performance of your computer. Whether you’re running a high-end gaming PC, a professional workstation, or maintaining a vintage Windows XP build, these specialized applications enable you to gauge CPU speed, GPU rendering capabilities, memory stability, storage read/write performance, and overall system responsiveness. By choosing the right tools and following best practices, you can diagnose issues, verify upgrades, and even compare your system’s performance against industry standards.
In this guide, we’ll walk you through a range of benchmarking tools suitable for different operating systems and hardware configurations. We’ll start with cross-platform solutions that work on Windows, macOS, and Linux, then move on to options tailored for older Windows XP-era systems, and finally highlight some modern benchmarks perfect for cutting-edge machines. You’ll also find practical tips on how to run benchmarks effectively, interpret results, and make more informed decisions about hardware upgrades and system optimization.
Benchmarking tools are essential for accurately measuring and comparing the performance of your computer. Whether you’re testing a modern powerhouse or a retro system running Windows XP, choosing the right benchmarking tools can provide valuable insights into CPU, GPU, storage, and overall system health. In this comprehensive guide, we’ll explore a variety of benchmarking options, organized by compatibility and purpose, to help you get the most out of your hardware.
Why Benchmarking Matters
Running benchmarking tools isn’t just for bragging rights. Performance benchmarks help you determine if your system is running optimally, identify hardware bottlenecks, and ensure that recent upgrades—like adding RAM or installing an SSD—are delivering the expected performance boost. They can also help troubleshoot issues: for example, if your computer suddenly feels sluggish, a benchmarking test might reveal that your CPU is overheating and throttling. By regularly benchmarking, you establish performance baselines, making it easier to detect changes over time, maintain system health, and make data-driven decisions when planning future upgrades.
Below are some tools that will help you get started on your benchmarking journey.
Cross-Platform Benchmarking Tools
Geekbench
- Purpose: Cross-platform CPU and GPU benchmarking.
- If you’re comparing recent CPU performance across platforms, Geekbench offers a straightforward cross-platform scoring system.
- Compatibility: Windows 7 and newer, macOS, Linux, Android.
- Download
Blender Benchmark
- Purpose: Measures rendering performance using Blender.
- Compatibility: Windows 10 and newer, macOS, Linux.
- Download
Tools for Windows XP and Earlier
CPU-Z
- Purpose: Provides detailed CPU information and benchmarking.
- Compatibility: Windows XP and newer.
- Download
Cinebench
- Purpose: Renders a scene to evaluate CPU and GPU performance.
- Compatibility: Windows XP and newer.
- Download
PerformanceTest
- Purpose: Measures overall system performance.
- Compatibility: Windows XP and newer.
- Download
3DMark06
- Purpose: GPU performance benchmarking for older DirectX 9 systems.
- For gamers looking to measure GPU upgrades under Windows Vista-era hardware, 3DMark06 is a time-tested choice.
- Compatibility: Windows XP and Vista.
- Download
SuperPI
- Purpose: CPU performance testing by calculating Pi.
- Compatibility: Windows 95 and newer.
- Download
Modern System Benchmarking Tools
PCMark 10
- Purpose: Evaluates productivity and system performance.
- Compatibility: Windows 10 and newer.
- Download
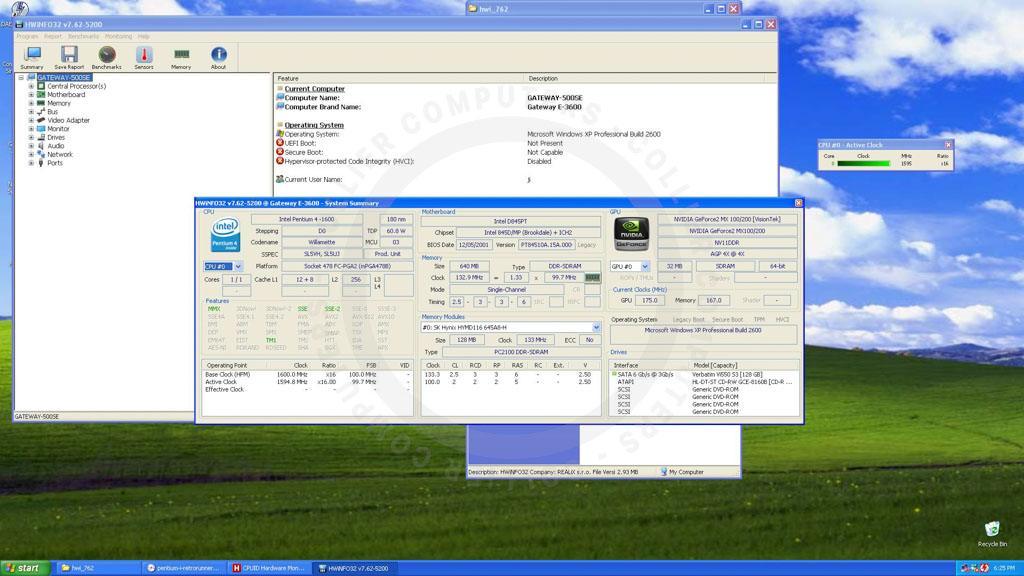
HWiNFO
- Purpose: Comprehensive hardware diagnostics and benchmarking.
- Compatibility: Windows XP and newer (portable version available for older systems).
- Download

CrystalDiskMark
- Purpose: Tests the read/write speed of storage devices.
- Compatibility: Windows XP and newer.
- Download
Unigine Heaven Benchmark
- Purpose: Graphics benchmarking with a focus on DirectX 11 performance.
- Compatibility: Windows Vista and newer.
- Download
Specialized Benchmarks for Retro Systems
Futuremark PCMark Vantage
- Purpose: Comprehensive benchmarking for Windows Vista systems.
- Compatibility: Windows Vista only.
- Download
AIDA64 Extreme
- Purpose: System diagnostics and benchmarks.
- Compatibility: Windows XP and newer.
- Download
Tips for Effective Benchmarking
- Document System Specifications: Always record CPU, GPU, RAM, storage, and software details before benchmarking.
- Consistency is Key: Run each benchmark tool multiple times to account for variability.
- Control the Environment: Close unnecessary applications and processes during tests.
- Analyze Results: Use tools like spreadsheets or graphs to compare and interpret performance scores.
Interpreting Your Results
After running benchmarking tools, you’ll receive numeric scores, frame rates, or throughput metrics that help quantify performance. To make the most of these results, compare them against known baselines, similar systems, or previous test runs. If your GPU benchmark score is significantly lower than the average for your graphics card model, this could indicate driver issues or insufficient cooling. If your CPU runs consistently at the expected performance level but your storage benchmarks lag behind, you might consider upgrading to a faster SSD. Successful benchmarking is all about understanding these numbers and using them to guide future improvements.
Common Pitfalls and Tips
While benchmarking tools are powerful, they must be used correctly. Always close unnecessary background applications, ensure your system is at a stable temperature, and run multiple tests to average out anomalies. Pay attention to the versions of the tools you use—newer versions often test different features or use updated methodologies. Keep documentation of every test run, including any hardware or driver changes made between benchmarks. This practice prevents guesswork down the road and creates a clear performance history. Finally, remember that benchmarks are synthetic tests; they offer valuable insights, but real-world performance can vary based on your specific usage patterns.
This guide offers a starting point for benchmarking various systems, from retro builds to cutting-edge PCs. Stay tuned for our next post, where we’ll focus exclusively on benchmarking tools tailored for all types of Windows systems—perfect for enthusiasts diving into retro computing!
If you know of any good tools that I’ve left out, please leave a comment, and I’ll give them a review. I’ve also included a link to download all the tools I mentioned in one main zip file, which you can download here.